Hi, Thanks for stopping by.
I am not actively using this blog at this time.
Information on Bell Bottom Girl Patterns is available at my new website BellBottomGirl.com
Digital Download Patterns are available on Etsy.
Happy Sewing!
Brenda
Saturday, May 3, 2014
Friday, January 10, 2014
A Not So Digital - Digital Pattern Tutorial in Progress
Making patterns in the olden days, aka My Time, was sort of .... well a process of trial and error. Sometimes more error than trial and the end result can become just a large bin full of crinkled up tissue and fabric trash.
Now a Days, The computer age has taken pattern drafting from home to a whole new level. Digital pattern software is definitely an easier and cleaner way to create patterns.... None the less, I am an Old School Girl,... in a very literal fashion. I learned to draft by hand way back in the days of disco and bell bottoms, and it remains my passion, in part because it seems to be a bit of a dying art. So, in a modern world exploding with all sorts of cool cybergenic precise options, I'm going to share a bit about the process of dusting off one of my old studio patterns and turning it into a multi sized, (still hand drafted), pattern with complete instruction tutorial ready for digital download. (ah hummmm, a little disclaimer, I do love to teach, but for now, I am just going to share the "Process" - from tissue paper to digital download sprinkled with a bit of the thoughts in between, and save the Principles of Old School drafting for another day.)
This is the pattern tutorial I am working on right now. It is a cute and simple Tunic Top pattern that I have been using for years. Here is the original pattern piece. I have no idea how long this has been in my pattern box, but I am going to venture to say at least 15 years. I think it was from a pixie costume, but it ended up being a really cute and easy top that I have made many, many times for lots of different projects.

This is the original pattern where I made it into a multi sized pattern for a different costume project. As you can see, it has been well loved, but pretty well preserved I must say.

One of the reasons I chose to make this pattern into a tutorial is because it is simple to make and it only has 2 main pattern pieces. It is really versatile and easily changed for a lot of different looks. But, the main reason I chose to convert this pattern for digital download is because of the skills I wanted to teach in the tutorial. In the finished tutorial I will show several ways to change the pattern and create different looks from this simple 2 piece pattern.
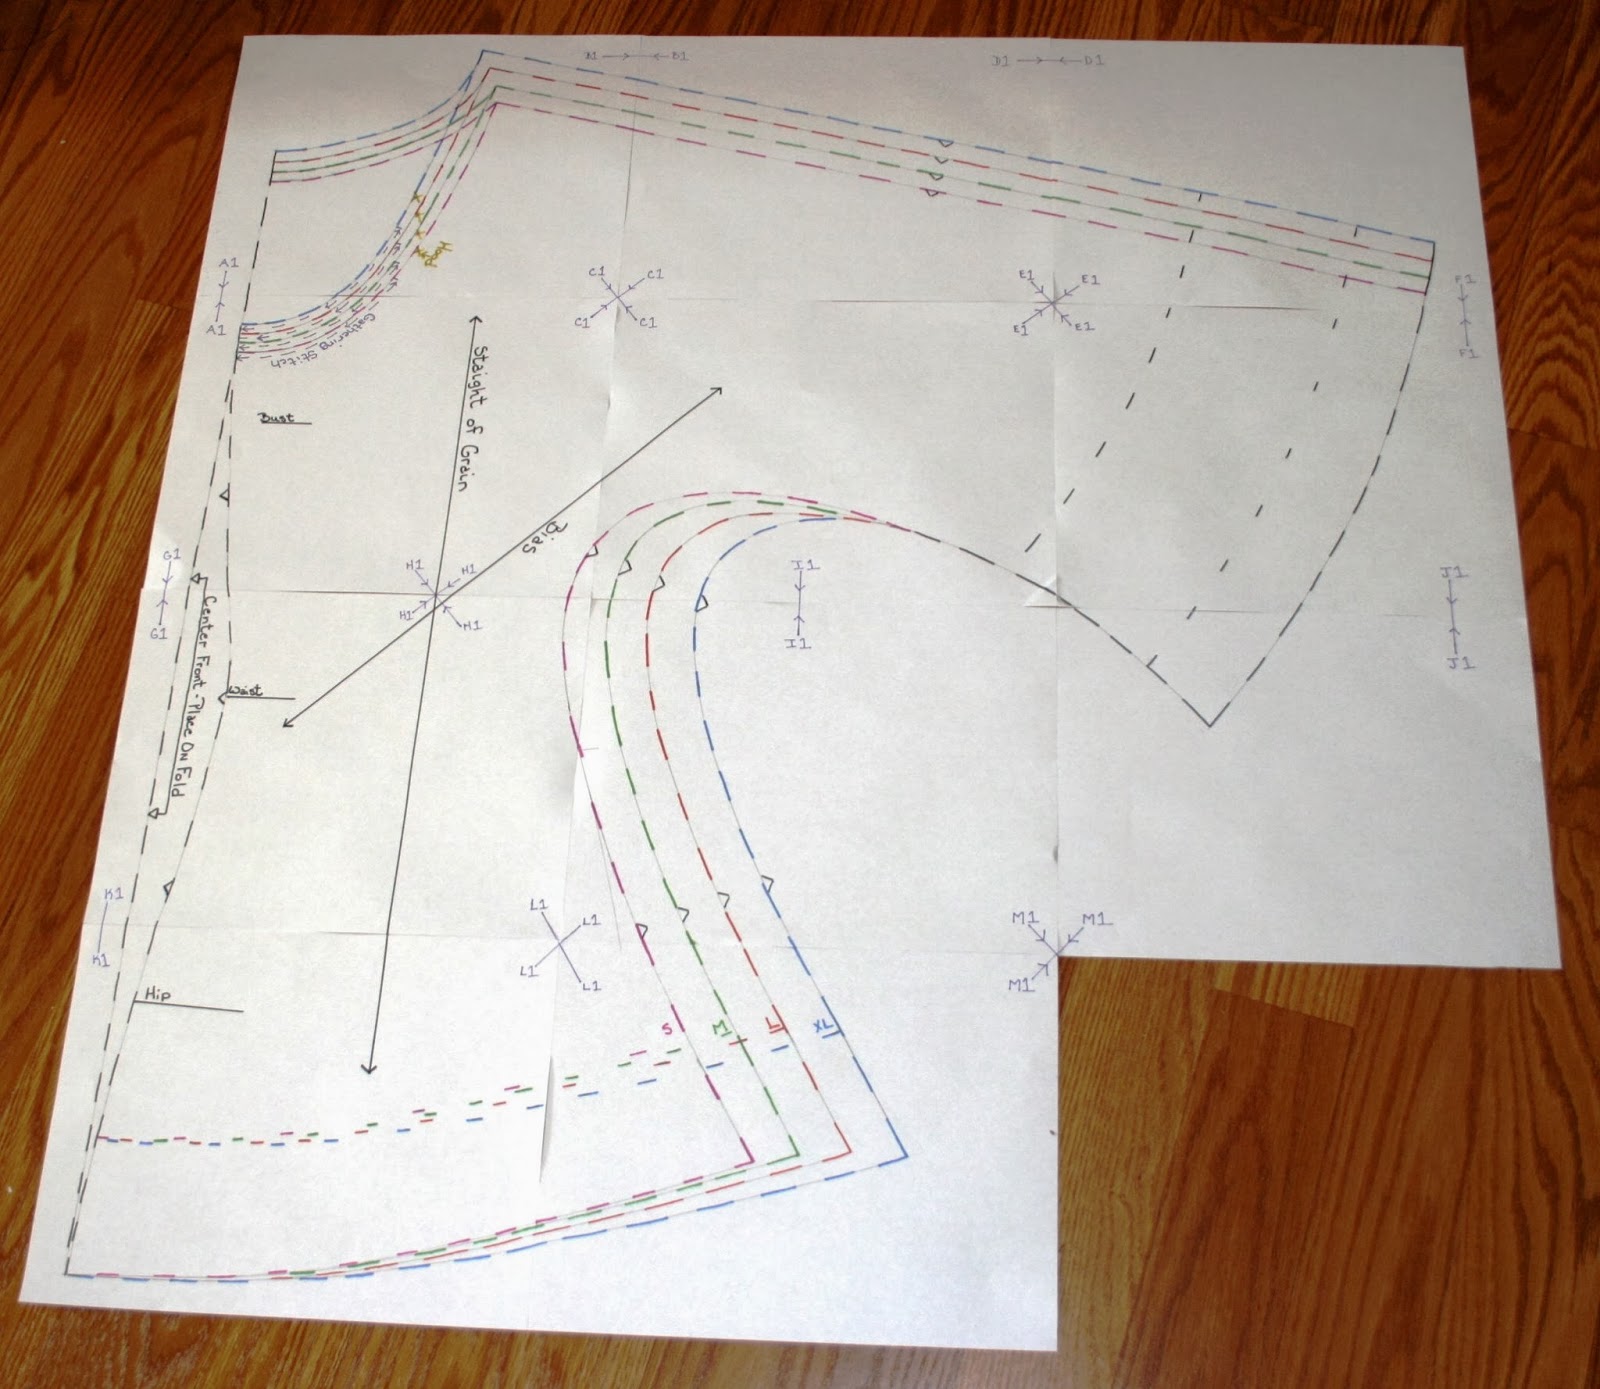
So here is the freshened up draft. I have made a few changes to the original pattern draft to make it a bit more yardage friendly. Here is what the pattern for the tunic top looks like now. These pieces are ready to be scanned and uploaded to a PDF.
 I have added an optional hood and pocket to this pattern. Yesterday I tested the new draft for the top and I'm pretty happy with the fit. I am just making one little change to the pocket and that part will be finished.

 I want to add the option of making this top longer into a dress. So today, I am working on the sample for the Dress pattern. I'll keep you posted on the next phase of this pattern in progress in a couple of days.
Now a Days, The computer age has taken pattern drafting from home to a whole new level. Digital pattern software is definitely an easier and cleaner way to create patterns.... None the less, I am an Old School Girl,... in a very literal fashion. I learned to draft by hand way back in the days of disco and bell bottoms, and it remains my passion, in part because it seems to be a bit of a dying art. So, in a modern world exploding with all sorts of cool cybergenic precise options, I'm going to share a bit about the process of dusting off one of my old studio patterns and turning it into a multi sized, (still hand drafted), pattern with complete instruction tutorial ready for digital download. (ah hummmm, a little disclaimer, I do love to teach, but for now, I am just going to share the "Process" - from tissue paper to digital download sprinkled with a bit of the thoughts in between, and save the Principles of Old School drafting for another day.)
This is the pattern tutorial I am working on right now. It is a cute and simple Tunic Top pattern that I have been using for years. Here is the original pattern piece. I have no idea how long this has been in my pattern box, but I am going to venture to say at least 15 years. I think it was from a pixie costume, but it ended up being a really cute and easy top that I have made many, many times for lots of different projects.
This is the original pattern where I made it into a multi sized pattern for a different costume project. As you can see, it has been well loved, but pretty well preserved I must say.
One of the reasons I chose to make this pattern into a tutorial is because it is simple to make and it only has 2 main pattern pieces. It is really versatile and easily changed for a lot of different looks. But, the main reason I chose to convert this pattern for digital download is because of the skills I wanted to teach in the tutorial. In the finished tutorial I will show several ways to change the pattern and create different looks from this simple 2 piece pattern.
So here is the freshened up draft. I have made a few changes to the original pattern draft to make it a bit more yardage friendly. Here is what the pattern for the tunic top looks like now. These pieces are ready to be scanned and uploaded to a PDF.
Wednesday, January 8, 2014
Its a Brand New Year
Wow, so we are already one week into a New Year. New Years are always exciting because you basically get to start over again with a brand new list of thoughts and plans and ideas that may or may not become accomplishments, but I like to look at it this way... the list in itself is an accomplishment. So, If I write one, I already did something awesome for the year.
Anywho, last year, I fell a little off the blog wagon... again. But I'm willing to give it another try. I'm not very good about keeping my resolutions, but one thing I would really like to make a part of my life is reading an actual book. I'm not a big book reader, mostly because I would rather spend my leisure time staring at pictures of lovely things I want to make on Pinterest or making awesome stuff in my hugely messy sewing/ craft room or in fancier terms "My Studio". None the less, I am committed to reading at least one book this year and I am going to start with this one... The Happiness Project (available at Amazon.com. Ps, I have no affiliation with Amazon, I just like buying stuff from there.)
I like feeling Happy, it is something that is really important to me. I'm sure there is going to be a lot of really awesome info in the Happiness Project book... but I fear it may take me a while to even crack open the cover. So for anyone else out there who is kind of a not so avid reader... here is a cool post about little things that can make you feel Happier in this blog by The Golden Girl... and the real bonus... you only have to read one page.
Can these 10 things help me feel Happier - Well I'm definitely sold on #1 - wearing lipstick. I love lipstick! and it does make me feel Happy - check out the rest of these simple acts that can give you and maybe someone else a Happy New Year of smiles.
http://www.thegoldengirlblog.com/home/10-ways-to-be-a-better-version-of-yourself-in-2014
Thursday, June 20, 2013
Seamlessly Simple - Circle Skirt
 I am so excited to share my newest pattern -
This Darling Circle Skirt

This quick and easy skirt pattern features the Bell Bottom Girl Signature Stretch Lace Waistband.
I love this waistband! It is so simple to make and flattering to any figure.

I have also included instructions for another one of my favorite waistband designs -
The Fit & Flatter "V" front band.
This cute skirt has No Side Seams,
Just add the waistband of your choice, hem it and wear it.
I love this pattern because it can be made in almost any type of fabric.
It always hangs really nicely!
This pattern is the first in a series of 4 Circle Skirt Ebooklet tutorials that I will be publishing.
Watch for - "More Circle Skirts" - coming this Fall.
It features 10 ways to add details and embellishments to this basic pattern.
 Hemming a circle skirt can be a bit of a challenge.
So I have also included a guide for several different techniques that can be used to hem a circular skirt.

Check out this Cute New Pattern on Etsy

Pssst - Use coupon code - BRENDASBLOG - at checkout, and get 10% off your purchase.

Wishing you a Sunny Day!
Monday, May 20, 2013
Say Yes to This Cute Scooter Dress
 The Santa Fe Scooter Shift Dress by BellBottomGirl is now available for sale on Etsy.
Full 41 page sewing instruction tutorial walks you through the steps to make this Cute Easy Fit Dress. Its available for Instant Digital Download so you can get started right away.
The Hand Drafted pattern prints on 19 pages. Its only 2 Main Pattern pieces in multi-size format sizes 6 - 18. I'm excited to offer this fun and versatile 1960's Mod style Dress Pattern.

This Scooter Dress has No Zippers, No Buttons and No Facings. The instruction tutorial shows you how to make bias binding for the collar and armholes. The pattern also includes instructions on how to sew a simple straight dart and two optional pockets.

Its a great casual summer dress that sews up quick and easy in Cottons, Linen, Seersucker and other light to mid weight woven fabrics. Here's the Link! Have Fun!

Sunday, March 31, 2013
Cream Coat Re-Fashion Part 2
A couple of days ago I posted pics of a cream colored wool coat I found at the thrift store.
 The coat was a size 12 and I needed to cut it down to about a size 4. Here is what I did.

First I had to figure out how much I needed to cut it down. Coats are a little tricky because they are sized to be worn over other clothing. I found that one of the easiest ways to figure out where to start when cutting down garments like this one is to look at the size chart from the manufacturer.
I googled a size chart for Harve Benard clothing but I couldn't find one provided by the company so I just referred to a general Women's size chart from a company that sells Outerwear..., like this one from http://www.sierratradingpost.com/.
Note: Please use the following sizing chart for
general reference only. Sizes between different vendors and
manufacturers do vary. Item specific sizing is best found in the item
description.
I compared the standard measurements for a size 12 to the measurements for a size 4 and figured the difference between them for Bust, Waist and Hips. I chose to compare them to a size 4 because that is the size I usually wear in a coat. The actual measurements for a size 4 are not exactly the same as my own, but I have found choosing the size that is closest to what I usually wear for each type of garment is a better match for fitting than comparing my own measurements to the ones in the size chart. These size charts never make sense to what size i actually would wear, but they do work really well for figuring out how many inches to take out or add to something.
Soooo, basically the difference between a size 12 ( the current size of the coat) and a size 4 (the size I want to make it)... is sometimes like this...
Bust 38 - 33.5 = 4.5 Inches
Waist 30 - 24.5 = 5.5 Inches
Hips 40 - 35.5 = 4.5 Inches
I also know that I am going to have to adjust the shoulders, but I will have to figure what I can take out when I get the coat taken apart.
 Next I just start by detaching the lining and taking out the sleeves.
I also removed the shoulder pads and armcye reinforcement.
 After taking the jacket a part, I tried it on and marked the shoulder line where I wanted the seam to sit at the edge of my shoulders.
Then I added the seam allowance and trimmed the shoulder seam back.

Next I marked the side seams using the measurements I figured from the steps above and then sewed the new seams.
Then I adjusted the sleeve seams by the same amount and reset them into the arm openings.

Next I picked out the old seam stitching and trimmed and pressed the seams at the new stitching.

In the back section of this coat, I used the extra fabric from adjusting the center back seam to create gathers at the back of the coat.
It was a fun detail, but the photos didn't turn out for me to show you how I did that step.
 Last I sewed the lining back in and replaced the shoulder pads and added some lace detail to the Back, Sleeves and Front of the coat and changed out the buttons.
 And that's it. I turned out pretty cute for only $4 and some stuff from my lace and button box.


First I had to figure out how much I needed to cut it down. Coats are a little tricky because they are sized to be worn over other clothing. I found that one of the easiest ways to figure out where to start when cutting down garments like this one is to look at the size chart from the manufacturer.
I googled a size chart for Harve Benard clothing but I couldn't find one provided by the company so I just referred to a general Women's size chart from a company that sells Outerwear..., like this one from http://www.sierratradingpost.com/.
General Women's Size Chart
For Alpha sizing, hover over "Sizes Available" shown above to determine the Numeric size conversion listed below.| 0 | 2 | 4 | 6 | 8 | 10 | 12 | 14 | 16 | 18 | 20 | 22 | 24 | |
|---|---|---|---|---|---|---|---|---|---|---|---|---|---|
| Bust | 31.5 | 32.5 | 33.5 | 34.5 | 35.5 | 36.5 | 38 | 39.5 | 41 | 43 | 45 | 47 | 49 |
| Waist | 23.5 | 24.5 | 25.5 | 26.5 | 27.5 | 28.5 | 30 | 31.5 | 33 | 35 | 37 | 39 | 41 |
| Hip | 33.5 | 34.5 | 35.5 | 36.5 | 37.5 | 38.5 | 40 | 41.5 | 43 | 45 | 47 | 49 | 51 |
Plus Sizing
| 16W | 18W | 20W | 22W | 24W | 26W | |
|---|---|---|---|---|---|---|
| Bust | 42 | 44 | 46 | 48 | 50 | 52 |
| Waist | 34 | 36 | 38 | 40 | 42 | 44 |
| Hip | 46 | 48 | 49 | 51 | 53 | 55 |
I compared the standard measurements for a size 12 to the measurements for a size 4 and figured the difference between them for Bust, Waist and Hips. I chose to compare them to a size 4 because that is the size I usually wear in a coat. The actual measurements for a size 4 are not exactly the same as my own, but I have found choosing the size that is closest to what I usually wear for each type of garment is a better match for fitting than comparing my own measurements to the ones in the size chart. These size charts never make sense to what size i actually would wear, but they do work really well for figuring out how many inches to take out or add to something.
Soooo, basically the difference between a size 12 ( the current size of the coat) and a size 4 (the size I want to make it)... is sometimes like this...
Bust 38 - 33.5 = 4.5 Inches
Waist 30 - 24.5 = 5.5 Inches
Hips 40 - 35.5 = 4.5 Inches
I also know that I am going to have to adjust the shoulders, but I will have to figure what I can take out when I get the coat taken apart.
 Next I just start by detaching the lining and taking out the sleeves.
I also removed the shoulder pads and armcye reinforcement.

Then I added the seam allowance and trimmed the shoulder seam back.

Next I marked the side seams using the measurements I figured from the steps above and then sewed the new seams.
Then I adjusted the sleeve seams by the same amount and reset them into the arm openings.

Next I picked out the old seam stitching and trimmed and pressed the seams at the new stitching.

In the back section of this coat, I used the extra fabric from adjusting the center back seam to create gathers at the back of the coat.
It was a fun detail, but the photos didn't turn out for me to show you how I did that step.


Thursday, January 24, 2013
Wool Coat Re Fashion
I found this nice wool Harve' Bernard coat at the thrift store a few weeks ago for $4 and finally got around to giving it a little make-over.

The coat was in really great condition, but it was a size 12 so I needed to cut it down a little. After about a good day of ripping, cutting & sewing back together - I ended up with this. I was hoping to dress it up a little but also give it a more vintage feel. Its hard to see the details in the pics, but I think it turned out pretty cute.
 Since the original coat was pretty roomy in the back. I was able to add some fun details to the back waist.

 I also added some vintage lace and old buttons to the front and on the sleeves and pocket openings.

I ended up cutting about 6 inches out of this coat to make it fit me. Tomorrow I will tell you how I did it.

The coat was in really great condition, but it was a size 12 so I needed to cut it down a little. After about a good day of ripping, cutting & sewing back together - I ended up with this. I was hoping to dress it up a little but also give it a more vintage feel. Its hard to see the details in the pics, but I think it turned out pretty cute.


I ended up cutting about 6 inches out of this coat to make it fit me. Tomorrow I will tell you how I did it.
Subscribe to:
Comments (Atom)