This Happened!
Now, this was by no means by first computer related baking accident...Sooo, while carefully scraping the creamy filling from my computer keys... I decided it might hopefully be my last.
so today... I am making a Fashionable cover of Clear Plastic.
Its a clear sheet of plastic that fits over the top of your computer like this...
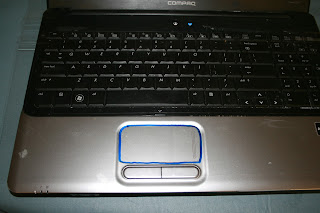
It has a little Peak A Boo hole for you mouse pad so you can scroll around the page without lifting the cover.
Or you can slip your hand under the cover if you really gotta update your facebook status while you're making dinner.Here's how I did it, if you want to create your own.
You will need This Stuff:
1. Some Heavy Weight Clear Plastic - available at most any fabric or craft store.
I'll tell you in a minute how much to buy when you measure your computer.
(Its pretty cheap and there is a ton of cool stuff you can do with Clear Plastic
so don't be afraid to get some extra if you are purchasing it by the yard.)
2. You will also need Your Computer..oh wait you probably are looking at it right now.
Some good scissors, but not your best fabric scissors because you will be cutting plastic,
You can also use a decorative edge rotary cutter.
A dry erase marker or regular marker and a tape measure.
I am sewing this one together on my sewing machine,
but if you don't have a sewing machine...
that's ok, I will also show you how to make one using a Hot Glue Gun.
1. First, I Measured My Computer.
The Width - Mine was about 15"
And Then...I measured...
The Length from the Top of the Screen and down across the keyboard.
Mine measures about 19 1/2"
2. Now I need to calculate for the size I will cut my plastic.
My computer measured 15" Wide
I added 1" to each side for my seams so my
total width is going to be 17"
My computer measured 19 1/2" Long
I added 4" for the top to slip over my computer screen so my
Total Length is going to be 23 1/2"
3. Next I Took out my Clear Plastic
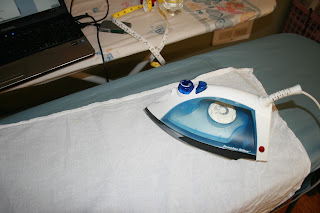
If yours came in a package it might look like this...Eww wrinkly
That's Ok, you can Iron the wrinkles out.
Just set your iron to the wool setting or cotton if you are feeling brave,
cover the plastic with a thin tea towel and
gently iron in little circles until the bigger creases come out.
VIP - Keep your iron moving ...
or you might end up with some little piles of wrinkled up plastic pieces
that look like those Shrinky dink things I used to make with my kids.
( I cut a piece off of the big bunched up piece from the package I bought so it was easier to work with.)
4. Next I Layed out the plastic on a smooth surface and marked out the measurements
I used a rotary cutter and mat, but if you don't have that stuff
you can just use a good old fashioned tape measure and marker.
Just mark your measurements (the ones you calculated from above)
on the plastic and connect the lines with a ruler.
You can use a piece of paper at one of the corners to check if your edges are straight.
5. Then I marked at the top where the plastic will fold down.
Just measure down 4" from the top edge of the plastic and make a little mark at each side.
If you aren't sure what is the top you can enlarge this picture for a little explanation.
Then I folded down the 4" section at the top.
When you get to this point yours should look something like this.
I made a good crease in the fold by running my fingers over it several times.
(If you want to secure the top flap down to hold it while you sew or glue the sides, you can put a little removable tape over middle part, be sure to use Removable Tape or Painters Tape so you don't get a residue on your plastic when you remove the tape. I learned that lesson the hard way on some travel bags I was making a while back... that sticky take stuff is really hard to get off. )
Next - If you want to glue your cover together. You can follow the steps here...
If you are going to sew your cover, you can skip the next couple of steps to 6B Below.
6.A Gluing your Cover Together
Measure in a 1/2" - 3/4" from the side edge at the top of the plastic where you made the fold crease.
If your computer is thick you will want to mark you plastic 1/2" in instead of 3/4".
Make a couple of marks at the top and another at about 6" from the top.
This is where you will run your bead of glue.
Next run a thin bead of glue at the mark below your crease line.
Let the glue sit for a couple of seconds so that it doesn't squish out too much when you press it down...
and then quickly fold the top portion down into the glue bead.
Press firmly to secure the glue. Repeat for the other side.
Ooops! Its ok you can fix it....
If your glue spreads out too much and
the cover won't fit over you computer,
- which is what happened to mine-
You can put a thin tea towel over
your plastic and loosen the glue with your iron.
Pull the plastic apart and Wait for it to dry.
Then pick off the bead of glue and then try again.
7. Yep... You are almost done!
Now you can try it on your computer ...
8. And mark the Peak A Boo hole for your Mouse Pad.
Then just cut out the hole with scissors.
9. I added some rick rack and a couple of shiny bling hearts with my glue gun
and Wha-La!
This Computer Apron is Done!
6B. Sewing Together A Plastic Computer Apron
When sewing on plastic I generally use a longer stitch length,
A 4 works well on my machine which is a gathering stitch.
(but you might want to use a little test piece to check your own.)
You can use a straight stitch or a zig zag stitch.
Choose either a 3/4" seam or a 1/2" seam depending on the thickness of your computer.
If you aren't sure, you can just use a 1/2" seam, it is ok if you cover is a little loose.
Now for Sewing on Plastic...
It can be tricky to sew on plastic because it wants to stick to the arm on your sewing machine.
The trick is to keep the plastic from sticking while helping it feed through the machine with your hand.
I use this little sleeve that I made out of a piece of stretch lace.
But a piece of paper taped around the arm of your machine works just as well.
So now you can just begin sewing at the top of the folded portion of your plastic and sew down the 4" portion you have folded over.
Check the fit on your computer and then...
Secure the top and bottom of your seam with a back stitch.
Remember that you will need to help the plastic flow through your machine by pulling it a bit as it passes through the feed dogs.
If gets a little stuck or doesn't want to go through smoothly,
your stitching might look a little loose on the back... like this...
But that's ok, because you can just cover it up with some trim.
You can sew on your trim or glue it on if you feel challenged by this whole "sewing on plastic experience".
I used a scallop edge rotary cutter and cut off the excess plastic where my marker shows.
7. To finish your cover just try it on your computer...
Mark the Mouse Pad Peak - A Boo hole - and cut it out with scissors
and Wha-La... your Computer Apron is Done!
Have Fun!!!
PS... in my second cover, I opted to cut it shorter so it only covered to the bottom of my keyboard rather then covering all the way to the bottom of my computer.
Either way... No more cinnamon on my keyboard and frosting splatter on my screen.
Now I am off to make another mess in the kitchen!


No comments:
Post a Comment