Thursday, June 20, 2013

Seamlessly Simple - Circle Skirt

I am so excited to share my newest pattern -

 This Darling Circle Skirt 


 This quick and easy skirt pattern features the Bell Bottom Girl Signature Stretch Lace Waistband.

  I love this waistband!  It is so simple to make and flattering to any figure.


I have also included instructions for another one of my favorite waistband designs -
The Fit & Flatter "V" front band.

This cute skirt has No Side Seams,
Just add the waistband of your choice, hem it and wear it.

I love this pattern because it can be made in almost any type of fabric.
It always hangs really nicely!  


 This pattern is the first in a series of 4 Circle Skirt Ebooklet tutorials that I will be publishing.

Watch for - "More Circle Skirts" - coming this Fall. 
 It features 10 ways to add details and embellishments to this basic pattern.  
 
  Hemming a circle skirt can be a bit of a challenge.


 So I have also included a guide for several different techniques that can be used to hem a circular skirt.


Check out this Cute New Pattern on Etsy


Pssst - Use coupon code - BRENDASBLOG - at checkout, and get 10% off your purchase.


Wishing you a Sunny Day!


Monday, May 20, 2013

Say Yes to This Cute Scooter Dress

The Santa Fe Scooter Shift Dress by BellBottomGirl is now available for sale on Etsy.

Full 41 page sewing instruction tutorial walks you through the steps to make this Cute Easy Fit Dress.  Its available for Instant Digital Download so you can get started right away.  

The Hand Drafted pattern prints on 19 pages.  Its only 2 Main Pattern pieces in multi-size format sizes 6 - 18.  I'm excited to offer this fun and versatile 1960's Mod style Dress Pattern.  


This Scooter Dress has No Zippers, No Buttons and No Facings.  The instruction tutorial shows you how to make bias binding for the collar and armholes.  The pattern also includes instructions on how to sew a simple straight dart and two optional pockets.  


Its a great casual summer dress that sews up quick and easy in Cottons, Linen, Seersucker and other light to mid weight woven fabrics.  Here's the Link!  Have Fun!


Sunday, March 31, 2013

Cream Coat Re-Fashion Part 2

A couple of days ago I posted pics of a cream colored wool coat I found at the thrift store.
The coat was a size 12 and I needed to cut it down to about a size 4.  Here is what I did.

First I had to figure out how much I needed to cut it down.  Coats are a little tricky because they are sized to be worn over other clothing.  I found that one of the easiest ways to figure out where to start when cutting down garments like this one is to look at the size chart from the manufacturer.

I googled a size chart for Harve Benard clothing but I couldn't find one provided by the company so I just referred to a general Women's size chart from a company that sells Outerwear..., like this one from http://www.sierratradingpost.com/.

General Women's Size Chart

For Alpha sizing, hover over "Sizes Available" shown above to determine the Numeric size conversion listed below.

0 2 4 6 8 10 12 14 16 18 20 22 24
Bust 31.5 32.5 33.5 34.5 35.5 36.5 38 39.5 41 43 45 47 49
Waist 23.5 24.5 25.5 26.5 27.5 28.5 30 31.5 33 35 37 39 41
Hip 33.5 34.5 35.5 36.5 37.5 38.5 40 41.5 43 45 47 49 51

Plus Sizing


16W 18W 20W 22W 24W 26W
Bust 42 44 46 48 50 52
Waist 34 36 38 40 42 44
Hip 46 48 49 51 53 55
Note: Please use the following sizing chart for general reference only. Sizes between different vendors and manufacturers do vary. Item specific sizing is best found in the item description.

I compared the standard measurements for a size 12 to the measurements for a size 4 and figured the difference between them for Bust, Waist and Hips.  I chose to compare them to a size 4 because that is the size I usually wear in a coat.  The actual measurements for a size 4 are not exactly the same as my own, but I have found choosing the size that is closest to what I usually wear for each type of garment is a better match for fitting than comparing my own measurements to the ones in the size chart.  These size charts never make sense to what size i actually would wear, but they do work really well for figuring out how many inches to take out or add to something.

Soooo, basically the difference between a size 12 ( the current size of the coat) and a size 4 (the size I want to make it)... is sometimes like this...
Bust   38 - 33.5 = 4.5 Inches
Waist   30 - 24.5 = 5.5 Inches
Hips   40 - 35.5 = 4.5 Inches
I also know that I am going to have to adjust the shoulders, but I will have to figure what I can take out when I get the coat taken apart.

Next I just start by detaching the lining and taking out the sleeves.


I also removed the shoulder pads and armcye reinforcement.


After taking the jacket a part, I tried it on and marked the shoulder line where I wanted the seam to sit at the edge of my shoulders.

Then I added the seam allowance and trimmed the shoulder seam back.


Next I marked the side seams using the measurements I figured from the steps above and then sewed the new seams.

Then I adjusted the sleeve seams by the same amount and reset them into the arm openings.


Next I picked out the old seam stitching and trimmed and pressed the seams at the new stitching.


In the back section of this coat, I used the extra fabric from adjusting the center back seam to create gathers at the back of the coat.

It was a fun detail, but the photos didn't turn out for me to show you how I did that step.

Last I sewed the lining back in and replaced the shoulder pads and added some lace detail to the Back, Sleeves and Front of the coat and changed out the buttons.

              And that's it.  I turned out pretty cute for only $4 and some stuff from my lace and button box.


Thursday, January 24, 2013

Wool Coat Re Fashion

I found this nice wool Harve' Bernard coat at the thrift store a few weeks ago for $4 and finally got around to giving it a little make-over.


   The coat was in really great condition, but it was a size 12 so I needed to cut it down a little.  After about a good day of ripping, cutting & sewing back together - I ended up with this.  I was hoping to dress it up a little but also give it a more vintage feel. Its hard to see the details in the pics, but I think it turned out pretty cute.
Since the original coat was pretty roomy in the back. I was able to add some fun details to the back waist.

I also added some vintage lace and old buttons to the front and on the sleeves and pocket openings.

I ended up cutting about 6 inches out of this coat to make it fit me.  Tomorrow I will tell you how I did it.

Saturday, January 12, 2013

Type 1 Diabetes - Oatmeal is Not a Cure

Just a little Info to Help Spread Awareness and Understanding of Type 1 Diabetes

I am a 48 year old Type 1 Diabetic.
I was Diagnosed from a coma on February 26th, 2010.
One of these days I may tell that crazy story here on blogger.

But for today - Here's a little Quick Info on Type 1 Diabetes

Type 1 Diabetes is not the "Diabetes" that most people hear or read about almost every day in the news.
Type 1 Diabetes, also known as Juvenile Diabetes, effects less than 1% of the population.
Though it generally strikes in children and young adults, it can be triggered at any age.
Type 1 Diabetes is Not Preventable and There is No Cure.
A person with Type 1 Diabetes has to inject insulin into their body or they will die.
Type 1 Diabetes is an Autoimmune Disease wherein the body mistakenly thinks that the cells in the pancreas that make insulin are bad and the body destroys them.
The cells called Islets cannot be re made in the body once they have been destroyed.
Type 1 Diabetes is not caused by eating too much sugar or by living an unhealthy lifestyle.
A person with Type 1 Diabetes can eat whatever foods they choose, but the right amount of insulin needs to be taken with the food so the carbs can be processed by the body.
Since a person with Type 1 Diabetes does not make insulin, it must be injected throughout the day.
Insulin can either be taken by injections or fed into the body through a little pump.

The body needs insulin to carry the glucose from foods to cells to be used to energy.
Without insulin a person with Type 1 Diabetes will become sick very quickly.
A person with Type 1 Diabetes has to count the carbs in all of the food eaten each and every day because the correct insulin has to be taken with meals and snacks so the body can process the carbs in the food.
A person with Type 1 Diabetes also has to consider that activities or stressful events might come into their day when considering how much insulin is needed for each day.
If a person with Type 1 diabetes has a more active day than was planned at the time of their shot, their body will have more insulin than their body needs and their blood sugar will suddenly drop or "Crash".
Crashing is very dangerous because it comes on quickly and the person must very quickly eat sugar to bring their blood sugar back up.  A person who is experiencing a "Crash" can suddenly become disoriented and pass out or even drop into a coma or have a seizure.
Diabetic Keto-acidosis or DKA is also a risk for a person with Type 1 Diabetes, It is the sickness that is caused by not having enough insulin in the body, but I will talk about that another day. This is the condition that caused me to go into a coma.

Daily life since my body decided it was a good idea to kill the little insulin making guys in my pancreas... is well to say the least - a lot different.  And some days it is sort of a challenge, but I am blessed that for the most part, thanks to insulin - I am able to live a pretty normal life.

Thursday, January 10, 2013

Computer Apron - Clear Plastic Computer Protector Tutorial

One of my favorite things, besides sewing of course, is creating stuff in the kitchen... but I seem to be sort of accident prone and last night while whipping up a batch of Delicious Imitation Hostess Cupcakes...  

This Happened!

Now, this was by no means by first computer related baking accident...Sooo, while carefully scraping the creamy filling from my computer keys... I decided it might hopefully be my last.

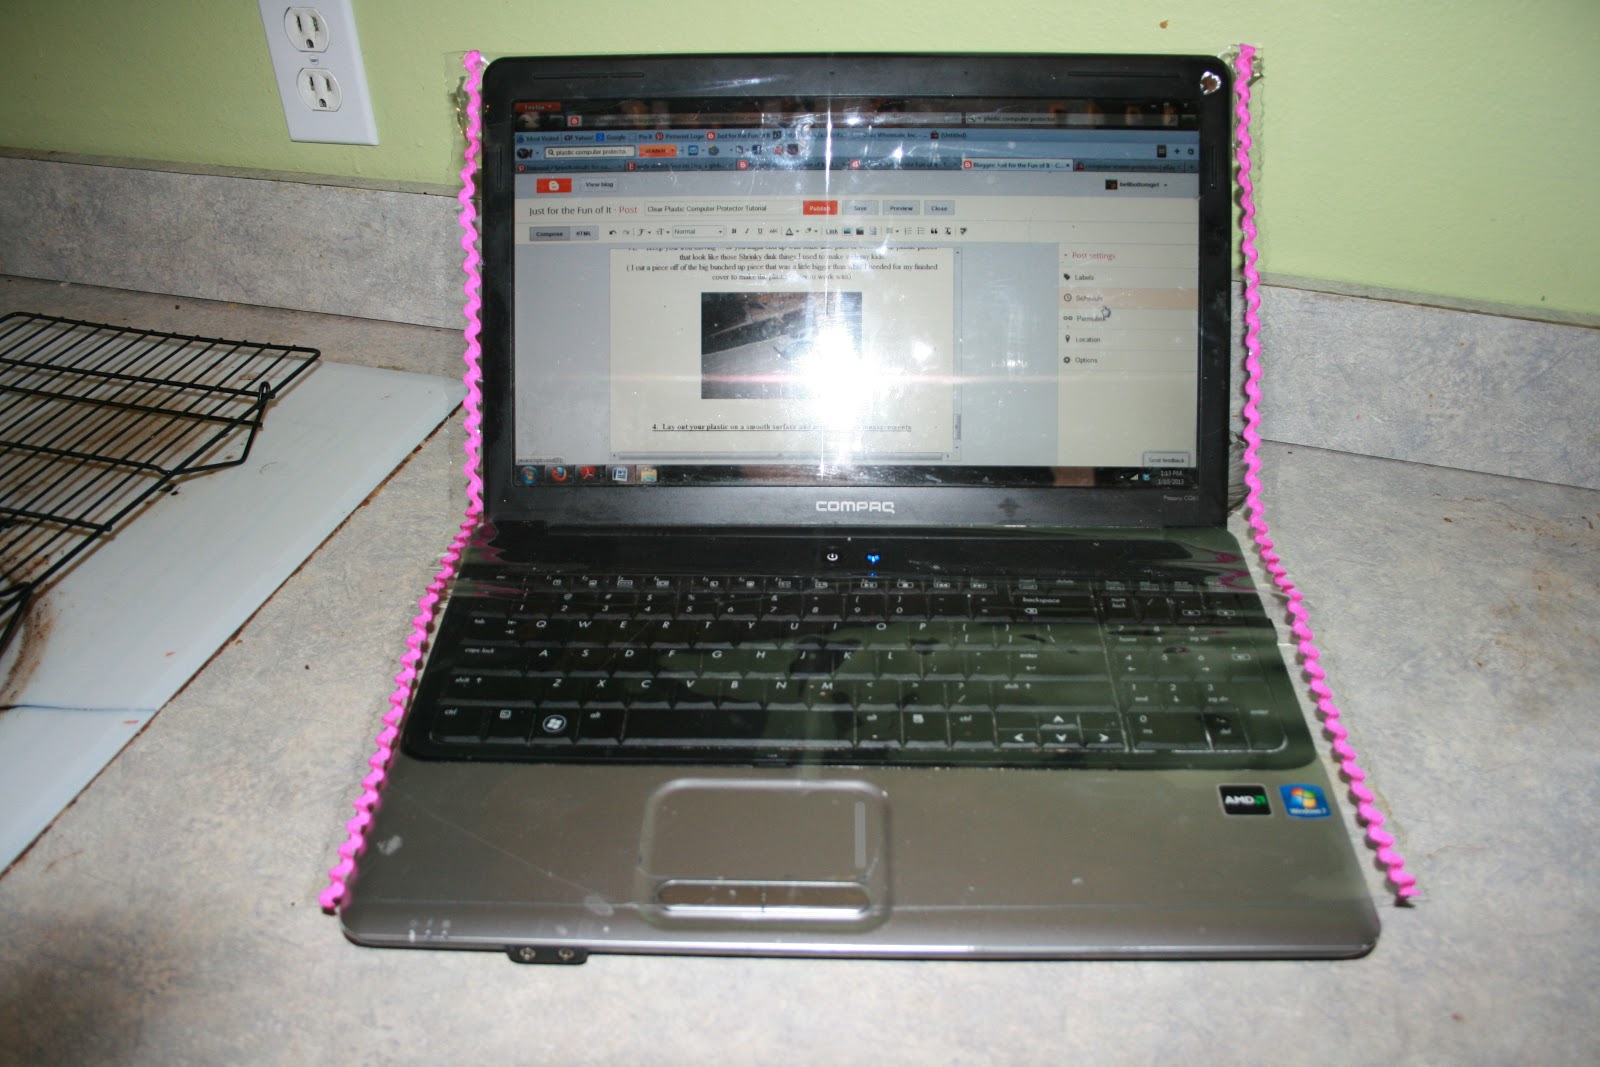
so today... I am making a Fashionable cover of Clear Plastic. 


Its a clear sheet of plastic that fits over the top of your computer like this...

It has a little Peak A Boo hole for you mouse pad so you can scroll around the page without lifting the cover.
Or you can slip your hand under the cover if you really gotta update your facebook status while you're making dinner.


Here's how I did it, if you want to create your own.

You will need This Stuff:


1.  Some Heavy Weight Clear Plastic - available at most any fabric or craft store.
I'll tell you in a minute how much to buy when you measure your computer.
(Its pretty cheap and there is a ton of cool stuff you can do with Clear Plastic
 so don't be afraid to get some extra if you are purchasing it by the yard.)

2.   You will also need  Your Computer..oh wait you probably are looking at it right now.
Some good scissors, but not your best fabric scissors because you will be cutting plastic, 
You can also use a decorative edge rotary cutter.
A dry erase marker or regular marker and a tape measure.
I am sewing this one together on my sewing machine,
 but if you don't have a sewing machine...
 that's ok, I will also show you how to make one using a Hot Glue Gun.

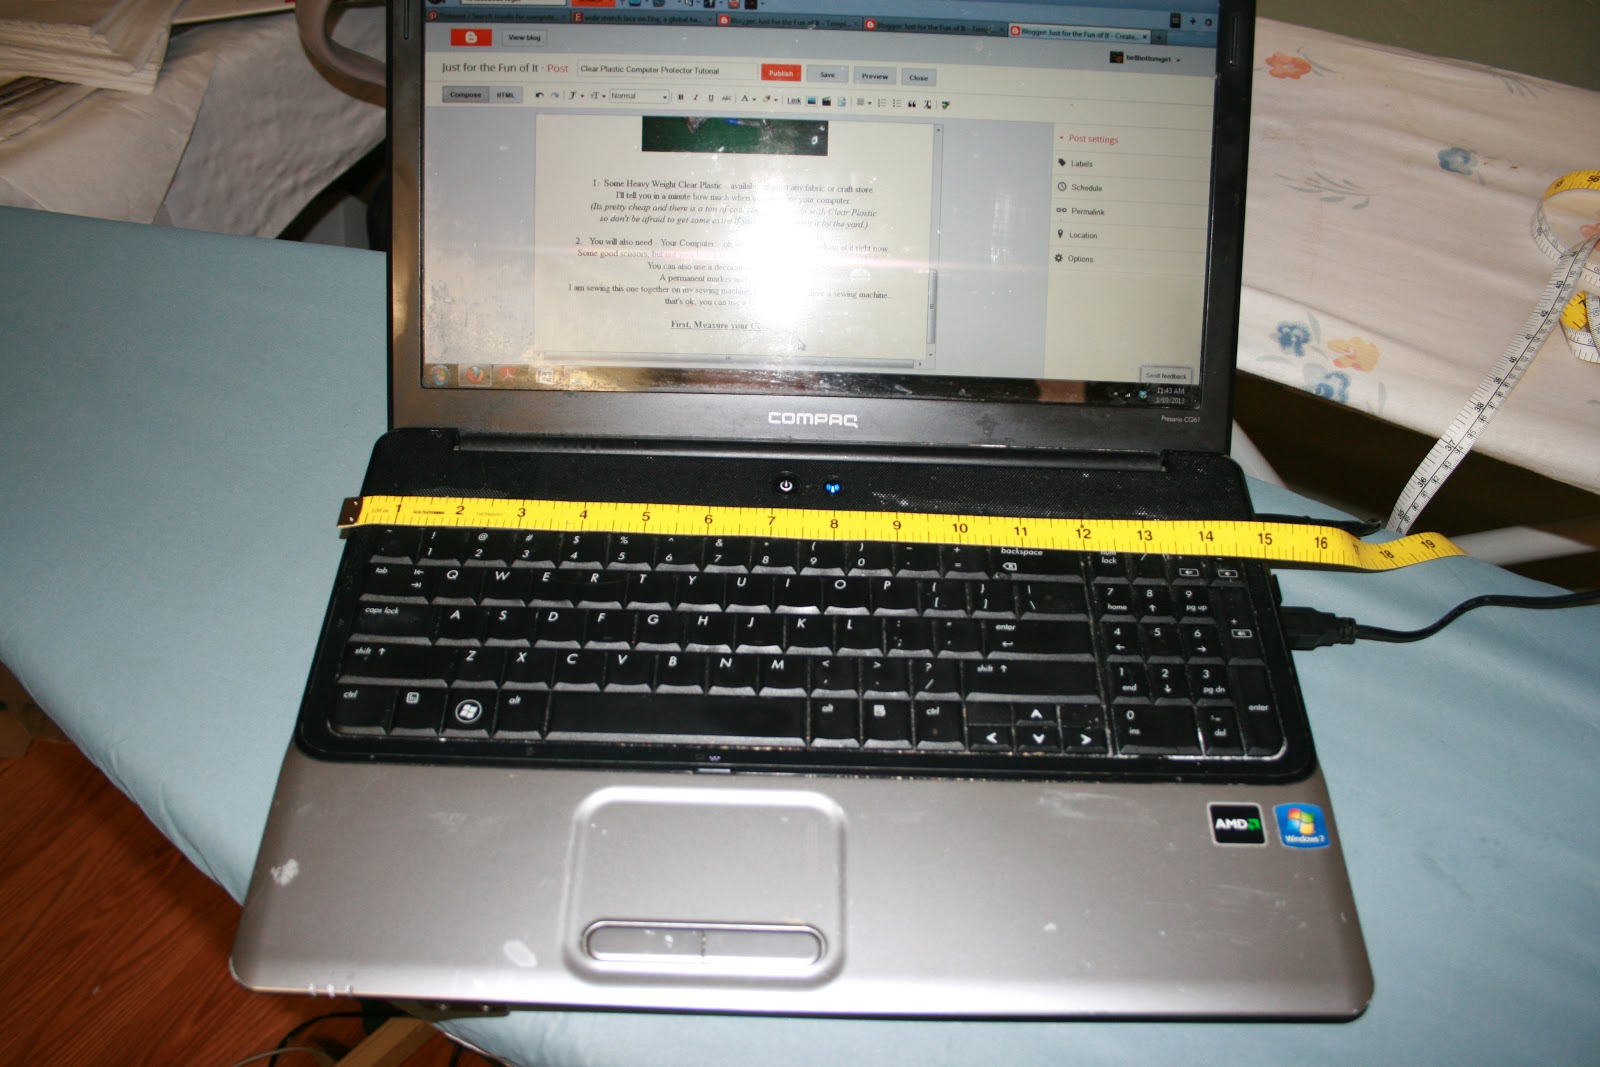
1.  First, I Measured My Computer.

The Width - Mine was about 15"
 
And Then...I measured...
 
The Length from the Top of the Screen and down across the keyboard.
Mine measures about 19 1/2"

2.  Now I need to calculate for the size I will cut my plastic.

My computer measured  15" Wide
 I added 1" to each side for my seams so my 
total width is going to be 17"

My computer measured 19 1/2" Long
I added 4" for the top to slip over my computer screen so my
Total Length is going to be 23 1/2"

3.  Next I Took out my Clear Plastic
If yours came in a package it might look like this...Eww wrinkly


That's Ok, you can Iron the wrinkles out.  
Just set your iron to the wool setting or cotton if you are feeling brave, 
cover the plastic with a thin tea towel and
 gently iron in little circles until the bigger creases come out.
VIP - Keep your iron moving ...
 or you might end up with some little piles of wrinkled up plastic pieces
 that look like those Shrinky dink things I used to make with my kids.
( I cut a piece off of the big bunched up piece from the package I bought so it was easier to work with.)


4.  Next I Layed out the plastic on a smooth surface and marked out the measurements


I used a rotary cutter and mat, but if you don't have that stuff
 you can just use a good old fashioned tape measure and marker.
Just mark your measurements (the ones you calculated from above) 
on the plastic and connect the lines with a ruler.
 You can use a piece of paper at one of the corners to check if your edges are straight.

5.  Then I marked at the top where the plastic will fold down.


Just measure down 4" from the top edge of the plastic and make a little mark at each side.
If you aren't sure what is the top you can enlarge this picture for a little explanation.

Then I folded down the 4" section at the top.
When you get to this point yours should look something like this.


I made a good crease in the fold by running my fingers over it several times.
(If you want to secure the top flap down to hold it while you sew or glue the sides, you can put a little removable tape over middle part, be sure to use Removable Tape or Painters Tape so you don't get a residue on your plastic when you remove the tape. I learned that lesson the hard way on some travel bags I was making a while back... that sticky take stuff is really hard to get off. )

Next - If you want to glue your cover together. You can follow the steps here...
 If you are going to sew your cover, you can skip the next couple of steps to 6B Below.

6.A  Gluing your Cover Together


Measure in a 1/2" - 3/4" from the side edge at the top of the plastic where you made the fold crease.
If your computer is thick you will want to mark you plastic 1/2" in instead of 3/4".
Make a couple of marks at the top and another at about 6" from the top. 
 This is where you will run your bead of glue.

Next run a thin bead of glue at the mark below your crease line. 
 Let the glue sit for a couple of seconds so that it doesn't squish out too much when you press it down...
 and then quickly fold the top portion down into the glue bead.
Press firmly to secure the glue. Repeat for the other side. 

Ooops! Its ok you can fix it....


If your glue spreads out too much and the cover won't fit over you computer,
- which is what happened to mine-
 You can put a thin tea towel over your plastic and loosen the glue with your iron. 
 Pull the plastic apart and Wait for it to dry. 
Then pick off the bead of glue and then try again. 

7.  Yep... You are almost done! 

Now you can try it on your computer ...

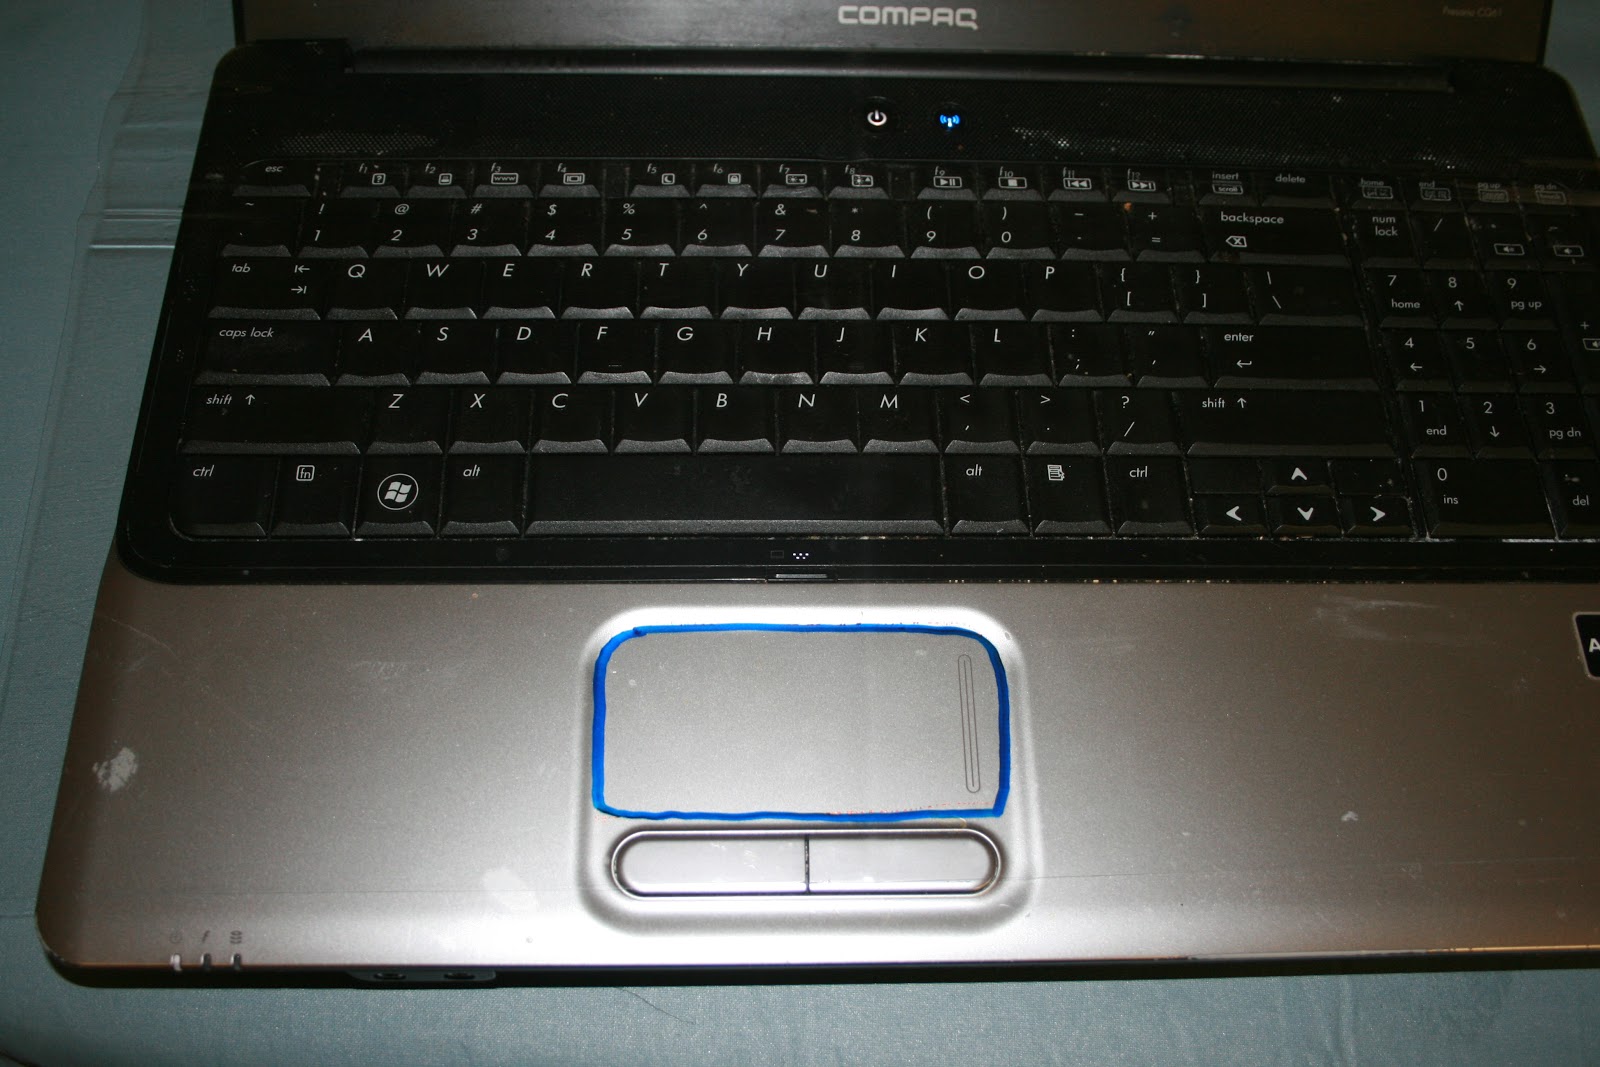
8.  And mark the Peak A Boo hole for your Mouse Pad.

Then just cut out the hole with scissors.

9. I added some rick rack and a couple of shiny bling hearts with my glue gun
and Wha-La! 


This Computer Apron is Done!

6B.  Sewing Together A Plastic Computer Apron


 When sewing on plastic I generally use a longer stitch length,
 A 4 works well on my machine which is a gathering stitch.  
(but you might want to use a little test piece to check your own.)
You can use a straight stitch or a zig zag stitch.
Choose either a 3/4" seam or a 1/2" seam depending on the thickness of your computer.
If you aren't sure, you can just use a 1/2" seam, it is ok if you cover is a little loose.

Now for Sewing on Plastic...


It can be tricky to sew on plastic because it wants to stick to the arm on your sewing machine.  
The trick is to keep the plastic from sticking while helping it feed through the machine with your hand.

I use this little sleeve that I made out of a piece of stretch lace.

But a piece of paper taped around the arm of your machine works just as well.


So now you can just begin sewing at the top of the folded portion of your plastic and sew down the 4" portion you have folded over. 
Check the fit on your computer and then...
 Secure the top and bottom of your seam with a back stitch.


Remember that you will need to help the plastic flow through your machine by pulling it a bit as it passes through the feed dogs.


If gets a little stuck or doesn't want to go through smoothly, 
your stitching might look a little loose on the back... like this...


 But that's ok, because you can just cover it up with some trim.  

 
You can sew on your trim or glue it on if you feel challenged by this whole "sewing on plastic experience".


I used a scallop edge rotary cutter and cut off the excess plastic where my marker shows.

7.  To finish your cover just try it on your computer...


 Mark the Mouse Pad Peak - A Boo hole - and cut it out with scissors

and Wha-La... your Computer Apron is Done!
Have Fun!!!

PS... in my second cover, I opted to cut it shorter so it only covered to the bottom of my keyboard rather then covering all the way to the bottom of my computer.
  Either way... No more cinnamon on my keyboard and frosting splatter on my screen. 

Now I am off to make another mess in the kitchen!